Pages

Showing posts with label Italian. Show all posts

January 16, 2014

Spicy Shrimp Pasta

This is one of my favorite types of meals for three reasons. The first is because I'm such a huge seafood lover! And especially with shrimp because I'll eat it however it's brought to me. The second is that I love pasta in tomato sauces. I'm pretty sure I could eat spaghetti every other day and be perfectly happy. The third reason is that I love spicy foods. Every now and then I'll challenge my pallet with some habanero wings or really spicy salsa, but I much prefer the types of foods that make you say "Hey! That has a good kick to it!"  And this meal delivers on that. In fact, it delivers on all three of these things. The pasta and shrimp are in a creamy tomato sauce that has just the right amount of heat and is really full of flavor.

What You'll Need:
1/2 pound of linguini or spaghetti
1/2 pound of shrimp
3 Tablespoons of butter
1/2 of a large onion (copped)
4 cloves of garlic (finely chopped)
1 14 oz. can of diced tomatoes (drained)
1/2 cup of dry white wine
4 oz. of tomato sauce (half of the little can)
1 cup of heavy cream
1 packet of dried peppers (like the kind that come with pizza)
dried oregano
dried basil
garlic powder
salt and pepper to taste

1. Start by boiling your water with a couple tablespoons of salt. Nothing is worse than forgetting that you still have to cook your pasta when your sauce is almost ready. Am I right?

2. If you're using fresh shrimp then I recommend peeling, deveining, and washing it before you get your sauce ready just so things will run more efficiently later on. I used frozen pre-cooked shrimp so I defrosted them by running them under warm water and taking off the tails.

*Frozen shrimp is a really easy way to add protein to your meals. They're easy to prep and you can use however much you like for any dish and put the rest back in the freezer.

3. To start the sauce, melt the butter in a medium sized pot or wide pan. Add the onion and saute for a few minutes then add the garlic with a dash of salt and cook for another minute so the garlic doesn't burn.

4. I have found this is the best time to add the pepper flakes. If you like really spicy foods then I would say two packets definitely the way to go. I like to taste it at this point and see what it needs. Just let the seeds let out some of the oils over medium heat. Right when things are getting spicy (and everything is, trust me) add the wine and let it cook off. 

**It's always a good idea to save those little pepper packets that you get when you order pizza (admittedly we have quite a few). Open them and add them to a shaker for easy access or store them in the packets and you have an easy way to add a little spice to any pasta, chicken, or casserole dish!

5. Now, add the canned tomatoes and the tomato sauce to the onions. I only used half of the small can of tomato sauce to compensate for the drained tomato juice but if you like a more "tomtoey" flavor go ahead and add more.

6. Add the cream and carefully stir it all together; letting it simmer on a medium-high heat.

7. As the ingredients are starting to come together, add the other seasonings.  Some days things just need more oregano or pepper than other days so it really depends on how much you like those flavors. Also, if you only used one packet (or a dash) of pepper flakes and want it spicier then you can still add more at this point. The spiciness will be slightly more mild, but still as delicious.

8. Now for the fun stuff! Add the shrimp to the sauce and let it cook or heat up. It'll only take a few minutes.
 
9. Drain your pasta and plate immediately onto giant pasta plates (or regular pasta plates if you're not obsessed like I am). Use a ladle to spoon the spicy shrimp tomato sauce onto the pasta. Top with some parmesan cheese.

10. Serve with a glass of wine and ENJOY!


November 1, 2011

Halloween Treats - Pinwheels and Pizza

One of my favorite holidays is officially over. It makes me sad because I absolutely love Halloween, but I'm also excited because it means the holiday season has officially started. When I was little my parents would let me go all out for Halloween, sometimes having multiple costumes for school and trick or treating. As I got older I looked forward to the month long airing of scary movies. Now I would never say that I'm too old for trick or treating because you can never be too old for a costume and candy, but since my life has been getting increasingly more hectic, the thought of walking in the cold, dressed as a sailor, knocking on strangers doors in an area I'm still new to didn't sound like my kind of thing, besides I had already gone out on Saturday night and had a fabulous time.

 
It didn't help that Halloween was on a Monday this year either, so I was ready to kick back and veg out. I did buy two bags of candy for any trick or treaters that might stop by (but what kid wants to climb stairs just to get candy... ok probably a lot) but our plans consisted of a scary movie marathon, margarita style pizza, and spinach and tomato pinwheels. I don't know if the whole bowl of candy was intended to be on the menu, but Mike and I ate it as an appetizer, main course, and dessert. Ooops...

Right before the good parts of Signs started we made our pizza. In 20 minutes dinner was done. As most of my go-to meals, these are semi-homemade to - you know how I roll.

Pinwheels
I'm not sure what these are really called but this name works for me. I got this idea from a Pillsbury commercial shown during the holidays last year, but I added a little extra oomph - tomatoes!! This is the perfect appetizer. I'm thinking about making these for Christmas Eve when I visit my family because they're so easy.
What You'll Need:
1 can (roll?) of refrigerated biscuits
chopped frozen spinach
1/2 a tomato
1/2 C of mozzarella cheese

Start by taking out all of the biscuits and rolling them into one piece of dough. Make sure the dough is rolled about 1/2 an inch thick. Sprinkle the cheese, spinach and tomatoes and lightly press down into the dough. Then roll the dough as tightly as possible and cut the roll about a 1/4-1/2 inch thick and place them on a greased cookie sheet. Bake them for as long as the container says to - about 10 minutes.

Eat them while they're hot. We ate ours with the pizza and it was the perfect meat-free (guilt-free) meal for a night in. 

Margarita Style Pizza

Once again this is an ode to a semi-homemade meals. I didn't feel like making a homemade crust so I bough one from the store. The crust was a little more spongy than I'm use to but the taste worked because of all the flavors on top. I made my own pizza sauce too.

What You'll Need:
Pizza Sauce
Pizza Crust
Mozzarella cheese slices
Basil
Tomato slices 

How could a pizza this simple be bad? For my sauce I just used one small can of tomato sauce and added some salt, garlic powder, Parmesan cheese, pepper, and oregano. I spread the sauce over my store bought crust, then put a layer of basil, cheese and then tomato.

Bake the pizza for 14 minutes at 450 degrees. This is just long enough to put the dishes in the sink (to wash later) and perhaps make a drink...hmmm...

This pizza is the perfect light pizza to eat while your sitting in sweats watching scary movies on the couch. I put a little fresh basil (which is currently my new obsession) on top and curled up - mainly because I was too scared to keep my feet on the floor... The tomatoes are so juicy and the cheese is so creamy that you should probably make two pizzas because they're so good.

We ended up having the best Halloween. It was perfectly relaxing and I couldn't have asked for anything better. I hope you all had a good Halloween too. I look forward to starting the fall off with you guys. Cheers!

October 1, 2011

Meatball Challenge #1: Grilled Italian Meatball Skewers

I'm doing my first personal cooking challenge. It started when my mom gave me a big bag of frozen meatballs that she didn't want. I was determined to make things other than spaghetti and meatballs or meatball subs (though I'll probably end up making these both). I wanted something new and different and I found my answer while looking through my pantry. Here it is, a simple meal that has tons of flavor and great textures - all on a handy stick.


What You'll Need:
18 meatballs (frozen or fresh)
1/2 jar/can of tomato sauce
2 zucchini 
cherry tomatoes
skewers

Start by preheating your oven to 350 degrees. Place around 18 meatballs on a foiled cookie sheet. I guessed I would probably put around three meatballs on a skewer and we would each have three skewers so I only cooked 18. Cook them for 15 minutes so they heat all the way through. I had no idea how these would taste but I went for it anyway.

Next you can get your zucchini ready. You're going to want the pieces around the same size as the meatballs so they cook evenly. I decided to make the pieces square so they would keep the skewers from rolling around with the round tomatoes and meatballs (I thought about this from past experience). This actually really helped.
 

Now I don't know about you, but I need more to my meal than three skewers of mostly veggies - especially when I had no way of knowing how they would turn out. I figured since we were having a relatively "healthy" meal I could add a little more fat. I decided to make potato chips too. Cut around 6 potatoes into thin slices and fry in two inches of oil. Place them on a plate with a paper towel on it and sprinkle some salt when they come out.

Lately I've been using the big cans of tomato sauce, but I usually only need about half a can when making food so I store the other half in an empty spaghetti sauce jar. I usually have sauce at hand all the time and I had half a jar in my fridge so I decided to use some to heat the meatballs in. This was a fabulous idea. Put the sauce in a sauce pan and keep on low heat to keep the splattering to a minimum. The sauce is already delicious on it's own but I added some black pepper, basil and oregano for some extra oomph. I think if I made this again I would add chili flakes for some extra spice.

When the meatballs are done, and while they're still hot, place them in your heated sauce. I left mine in for about 8 minutes so they could soak up some sauce (according to Mike and Alton Brown, this works. Good enough for me). At this point the meatballs have all sorts of potential for other dishes.
Mmmmm
When the meatballs were basically done, I left them in the sauce and got my veggies and skewers ready to start assembling. All kinds of veggies would be good with these too. Mushroom and onions would probably be amazing but this is what I had on hand.

I ended up only putting two meatballs on a skewer then I made an all veggie skewer (which was also delicious). Tell me these don't look good already...

I placed the skewers aside and heated up my grill. Confession: I'm slowly starting to fall in love with this grill... in a totally normal way though. It heats in a couple of minutes, DRAINS FAT, and makes food taste better. Yes my friends that is all love.

When my grill was heated I was able to fit most of my skewers on the first round. I cooked mine for 6 minutes with the top closed down, turned them, then cooked them for another 4-5 with the grill open. Since the meatballs are already cooked you just have to cook the zucchini to the texture that you want.

When they're done, plate them and pour more of your tomato sauce over them. Serve them with your potato chips, a cold glass of lemonade, and enjoy.

Overall, I don't think I did too bad for my first "challenge." The flavors were great and the meatballs had a great flavor. This was the perfect amount of food for us too. This makes me very excited about the food that's to come. Stay tuned my fellow foodies.

August 17, 2011

Double-Feature Pizza


One of the things Mike and I like to do in the summer is go to the drive-in. We always take our own snacks and dinner and veg out in our pajamas. They do the usual two movies, or three on the weekends, and every Tuesday they have a discounted price. We usually order a pizza and take it to go, but last summer we decided to make our own pizza and take it. We did the same thing last night. It's surprising how easy it is to make your own pizza, and you can make it however you want without the extra charge for toppings.

You'll want to make your dough ahead of time. I leave any dough-making for Michael because I'm not much of a baker and dough tends to get me frustrated. Instead, I'm in charge of toppings and sauce (fine by me).

What You'll Need - Dough:
4 1/2 C Bread Flour
2 t Salt
1 t Yeast
1/4 C Olive oil
1 3/4 C Ice water
Bread mixer

Mix all of the ingredients together in the bread mixer. Switch the machine to the "dough" setting and press start. Let it mix for and hour and a half. 
 When it's done, take it out and separate it into two (yes you get two pizzas), roll them into two separate balls, and put them in ziplock bags and place them in the fridge. It's best to leave them overnight but you can do a couple of hours too.

Test Pizza

Since we had two sets of dough, we decided to make a cheese test pizza for lunch.

What You'll Need:
1 dough roll
Favorite pizza sauce
8 oz of shredded Mozzarella cheese

While the dough was in the fridge Mike shredded the cheese.

Meanwhile I was getting the sauce ready. Warning - the sauce isn't very technical. It's more about the taste you prefer but mine is a good base to start with. 
This will be more than enough sauce for two pizzas.
2 8 oz. Cans of tomato sauce
1 1/2 t Chopped garlic
1/3 t Honey
1/4 t Salt
1/4 t Pepper
3 T of Parmesan cheese
1 1/2 t Oregano
1 t Basil
1 t Garlic powder 
*side note* If you use tomato paste instead of sauce, do 8 oz. of paste and 8 oz. of water.

Before you get your hands dirty, preheat your oven to 450 degrees. Now it's time to stretch out the dough. Like I said before, this is Mike's job. Start by putting some flour on the counter. The dough doesn't stretch out too big so don't worry if you have an apartment-sized kitchen like we do. Mike stretched the dough until it was around a 1/4 of an inch thick.

When it's stretched, put it on a big cookie sheet and put the sauce on. Put as much as you'd like (remember you made enough for more than two pizzas) and leave a 1 inch space around for the crust.

Put the cheese on, try not to munch off the plate... Place it in the oven and bake for about 10-15 minutes. You can sit on your kitchen floor, like we did, looking at it bake if you'd like.

Okay.... problem. Despite my best efforts to persuade him not to, Mike used a baking stone. I know lot's of people use them for even baking, blah, blah, blah, but I don't care for the things. I like things, especially my pizza, with some crunch. This didn't happen using the stone. Hey, I never said everything on my blog would be perfect... despite my best efforts. The pizza was delicious, don't get me wrong, but I could compare it to a frozen pizza. Everything was very one-note. Do you know what this means? We made another one *smiles.*
Of course we still ate it - even okay pizza is good pizza!
The Real Deal- Pizza Number 2

So after lunch, and a new game plan, we stepped it up. We made our favorite combo pizza - DELISH!! It's the same basic concept as the first pizza, with a few small adjustments.

What You'll Need:
1 Dough roll
My pizza sauce
1 Carton of mushrooms
1 sm Green bell pepper
1/2 package of Canadian Bacon (or sliced deli ham)
1 Red onion
8 oz. Mozzarella cheese
Olive oil

The first thing you want to do is cut your mushrooms into slices. I really advise doing this the night before so they dry out as much as possible. Whatever you do DO NOT WASH THEM UNDER WATER! If you do this then you'll have a big puddle of water in the middle of your pizza, it'll get soggy, and it's just bad - don't do it. Since we didn't do any prep the night before like we usually do, we cut the mushrooms, put them on a cookie sheet, and put them in the fridge, uncovered. 

If your watching a Giants game like we were, you won't be getting much done in terms of prep so we rushed our process a bit - luckily for us this is really easy. Not to mention we planned to leave to the drive-in at 8, and it was 7:00. Oops.

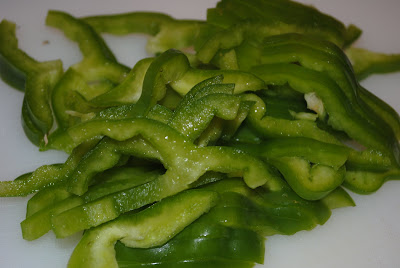
When you're ready, slice the veggies. You don't have to add ham or any meat if you want a vegetarian pizza, we've added some tomato and it's just as delicious. I don't eat a lot of meat so we used some Canadian Bacon for flavor (and breakfast the next day). It added just enough flavor.
He's going to chop off his fingers!!
I adore the color of these.
 Shred the cheese next...
 Take out the mushrooms...
 Here you go. Like I said, I usually like tomatoes on the pizza but this was still awesome.

Our next step was the dough (still Mike's job). Our new game plan was to make the middle of the pizza thinner so it would crisp up and the crust would be soft because it would be thicker. The best way to get this done is to spin the dough. 

We still used the baking stone (despite a disapproving girlfriend) but it was a lot better because the way we laid out the dough.

*****
How to tell if your pizza is the right size for your box:
We got a box from Mike's work so we could transport it to the drive-in. He showed me this is how you tell if it'll fit. It worked.
*****

Put the dough onto a floured cookie sheet. Add the (my) sauce, once again leaving a space around the edge for the crust...

Add the cheese and lay a thin layer of bacon. 

Add the rest of your veggies or other desired toppings. Then rub some olive oil around the crust.

Slide the pizza from the cookie sheet onto the baking stone (or not, in my opinion) but that's what we did. Once again bake for 10-15 minutes. I hope what you get is as awesome as what we got!
 Our new method worked! In fact this is exactly what we did last summer and it worked again. Maybe we shouldn't go as long without making pizza anymore. *smiles again.* The pizza was saucy and crispy. The vegetables were awesome together, too. Mike said it was almost as if the bell peppers and onions got sauteed because they game out really juicy and I agree. Letting the mushrooms air out for as long as we did helped too. We didn't have a gross puddle in the middle of our pizza. Success!
We were able to box up the pizza by 8:10 and get out the door. Mike got some pizza boxes from his work but I'm sure if you went to your local pizza place they could give you a box for a small fee or even for free. Now, go out and make your own pizzas!
Major foodie love!