Pages

Showing posts with label Dinner. Show all posts

July 23, 2014

Turkey Stuffed Peppers

In this post I talked about clearing out my pantry and trying to use up any processed, boxed, go-to meals. One of the things that I had always turned to was Rice-A-Roni for side dishes. This recipe is a product of using the rice in a way that makes it more than just a boxed side. Besides also being a recipe you can use with regular rice and lots of seasonings, it tastes just as great with the Rice-A-Roni. I also use turkey because I don't eat a lot of red meat but it can be easily substituted with ground beef or black beans. What you get in the end is a filling, delicious, and guilt-free meal that is super easy to make!

What You'll Need:
3 large bell peppers
3 Tablespoons of vegetable oil
1/2 of an onion
1 pound of ground turkey 
1 teaspoon of cumin
1 teaspoon garlic powder
cheese
sour cream (optional)

What To Do: 

1. Start by preparing the rice per the directions on the box. You'll want to have this ready so you can add it to the turkey when it's done cooking. 

*If you use regular rice cook it beforehand by boiling it in chicken or veggie broth and season with cumin, garlic powder, and chili powder. 

2. Preheat your oven to 350 degrees and line a baking sheet with non-stick foil. Wash and cut your peppers in half (long-way). Use a spoon (or your hand) to pull out the center of the bell pepper and dispose of the seeds. Place them on the baking sheet and set aside. 

*This recipe gives two people three halves or three people two with a side.

3. In a large pot or pan heat up your oil. Brown your turkey for about 5 minutes. While that is cooking, chop your onion and then add it to the turkey. Add a the cumin and garlic powder and let the meat finish cooking. Drain the meat if there's a lot of liquid so it doesn't make the rice soggy. 

4. Add the cooked rice to the turkey mixture and mix it all together. 

5. Fill the peppers with the turkey and rice mix and cook for 10 minutes. Add cheese to the tops of the peppers and then bake for another 3 minutes so the cheese can melt. 

6. Serve with a dollop of sour cream and salsa and ENJOY!


January 22, 2014

Tortilla Soup

This is one of my favorite recipes! I could eat this soup in the dead of winter or in the hottest times of summer and be just fine. I love the textures of the crispy tortilla strips, the savory and spicy soup, the creaminess of the melted cheese, and the freshness of the cilantro! Yummm.... Okay I'm officially ready to make this again! This is also great because you can customize it however you like and add more of your favorite toppings.

What You'll Need: 
8-10 corn tortillas
1/4 cup of oil 
1 small onion (chopped)
2 cloves of garlic
1-2 serrano peppers (seeded and finely chopped)
4 cups of chicken broth
1 can diced tomatoes (with juice)
salt and pepper
garlic powder
1 rotisserie chicken 
1/2 cup of Mexican blend cheese 
2 limes

What To Do:

1. Preheat your oven to 350 degrees. Line a large baking sheet with non-stick foil.

2. Start by cutting your tortillas into strips. I usually make 6 strips then cut them in half. I think those are the best size pieces for the soup. Put them on the baking sheet, lightly salt them, and bake for 10 minutes.

3. Next, take off the skin and shred all of the white meat from your rotisserie chicken. You don't want the pieces too big, just bite size.

*You can also use a regular chicken breast by boiling it in water or chicken broth with some chili powder, garlic powder, pepper, and Season All. Boil until center of chicken reaches 160 degrees then shred like normal.

4. When the tortilla strips are done, set them aside in a bowl and put the shredded chicken on the same cookie sheet and bake for 8 to 10 minutes. I do this because it dries the chicken out a little and it ends up holding up to the soup a lot better.

5. Now for the soup. Heat up the oil in a large pot. Add the onion and cook for 3 minutes. Add the garlic, peppers, and a bit of salt to the onions. Cook everything for another 3 minutes, stirring frequently.

**Make sure you wear gloves or wash your hands really well after handling the peppers (this comes from experience...) I'm also never good at judging whether the peppers are going to be spicy or not but I like spicy so I always go for two. If you go for three, let me know how it turns out!

6. Add the broth and tomatoes and boil for 15 minutes. Season with salt and pepper and a little garlic powder. Then add the chicken and let it all simmer for another 5 minutes.

5. Top the bowls of soup with tortilla strips, cheese, and cilantro (it's quite possible that I add too much cilantro but I'm totally okay with that). Squeeze some lime over everything and ENJOY!

***Avocados are also great with this soup if they're in season


January 16, 2014

Spicy Shrimp Pasta

This is one of my favorite types of meals for three reasons. The first is because I'm such a huge seafood lover! And especially with shrimp because I'll eat it however it's brought to me. The second is that I love pasta in tomato sauces. I'm pretty sure I could eat spaghetti every other day and be perfectly happy. The third reason is that I love spicy foods. Every now and then I'll challenge my pallet with some habanero wings or really spicy salsa, but I much prefer the types of foods that make you say "Hey! That has a good kick to it!"  And this meal delivers on that. In fact, it delivers on all three of these things. The pasta and shrimp are in a creamy tomato sauce that has just the right amount of heat and is really full of flavor.

What You'll Need:
1/2 pound of linguini or spaghetti
1/2 pound of shrimp
3 Tablespoons of butter
1/2 of a large onion (copped)
4 cloves of garlic (finely chopped)
1 14 oz. can of diced tomatoes (drained)
1/2 cup of dry white wine
4 oz. of tomato sauce (half of the little can)
1 cup of heavy cream
1 packet of dried peppers (like the kind that come with pizza)
dried oregano
dried basil
garlic powder
salt and pepper to taste

1. Start by boiling your water with a couple tablespoons of salt. Nothing is worse than forgetting that you still have to cook your pasta when your sauce is almost ready. Am I right?

2. If you're using fresh shrimp then I recommend peeling, deveining, and washing it before you get your sauce ready just so things will run more efficiently later on. I used frozen pre-cooked shrimp so I defrosted them by running them under warm water and taking off the tails.

*Frozen shrimp is a really easy way to add protein to your meals. They're easy to prep and you can use however much you like for any dish and put the rest back in the freezer.

3. To start the sauce, melt the butter in a medium sized pot or wide pan. Add the onion and saute for a few minutes then add the garlic with a dash of salt and cook for another minute so the garlic doesn't burn.

4. I have found this is the best time to add the pepper flakes. If you like really spicy foods then I would say two packets definitely the way to go. I like to taste it at this point and see what it needs. Just let the seeds let out some of the oils over medium heat. Right when things are getting spicy (and everything is, trust me) add the wine and let it cook off. 

**It's always a good idea to save those little pepper packets that you get when you order pizza (admittedly we have quite a few). Open them and add them to a shaker for easy access or store them in the packets and you have an easy way to add a little spice to any pasta, chicken, or casserole dish!

5. Now, add the canned tomatoes and the tomato sauce to the onions. I only used half of the small can of tomato sauce to compensate for the drained tomato juice but if you like a more "tomtoey" flavor go ahead and add more.

6. Add the cream and carefully stir it all together; letting it simmer on a medium-high heat.

7. As the ingredients are starting to come together, add the other seasonings.  Some days things just need more oregano or pepper than other days so it really depends on how much you like those flavors. Also, if you only used one packet (or a dash) of pepper flakes and want it spicier then you can still add more at this point. The spiciness will be slightly more mild, but still as delicious.

8. Now for the fun stuff! Add the shrimp to the sauce and let it cook or heat up. It'll only take a few minutes.
 
9. Drain your pasta and plate immediately onto giant pasta plates (or regular pasta plates if you're not obsessed like I am). Use a ladle to spoon the spicy shrimp tomato sauce onto the pasta. Top with some parmesan cheese.

10. Serve with a glass of wine and ENJOY!


July 31, 2012

Lemon Chicken


Everyone loves takeout. I don't care if you're willing to admit it but I know it's true. Come on, you're a foodie I would never hold that against you. I do, however, recognize the drawbacks of the usual takeout foods like that they're greasy, full of MSG, fat, and everything else that makes them good. So how can you resist a recipe that is homemade and BETTER than what you get for $8.00 a portion at a restaurant? I don't think you could.

I'm posting a few more pictures here because the steps are pretty specific. Hope they help.

What You'll Need:
2 1/2 lbs of chicken breast
2 Tbsp soy sauce
1/2 tsp salt
3 eggs
1 cup cornstartch 
1 1/2 tsp baking powder
pepper
Oil for frying
(recipe for sauce is below)

1. Start by cutting your chicken into cubes. We're going for bite-size here.

2. Add the soy sauce and salt to the chicken. Cover and place it in the fridge for at least 30 minutes. Don't be afraid of the soy sauce here because you're not going to be adding any salt later. Now's the time to get salty.

3. When the chicken is almost ready get your oil hot. You'll need about 2 inches of oil. You can also get your batter ready.

4. In a bowl mix your cornstarch and baking powder. When it's mixed add your eggs and pepper. It's going to be hard to mix because of the cornstarch so you'll have to mix pretty fast in order to get everything incorporated. It's kind of like a science project.

5. Put your chicken in and get it all coated.

6. Put small batches of chicken in the oil in order to control cooking temperature. We were able to get everything done in two batches. Cook until the chicken is "the right color" (Mike's words, not mine) then use a meat thermometer to make sure chicken is fully cooked. Put it on a paper towel covered plate to drain any excess oil.


Lemon Sauce

What You'll Need: 
1 cup chicken broth
2 Tblsp of cornstarch
1/3 cup sugar
2 Tbsp lemon juice
3/4 tsp salt
2 Tbsp oil
1. In a small sauce pan (which is appropriate) combine your chicken broth, sugar, lemon juice and salt and warm over low heat.

2. Remove this sauce and place in a bowl so you can add the cornstarch. Whisk it together. 

3. When it's all mixed heat the 2 tablespoons of oil in the sauce pan so it get's really hot. When it's ready add the sauce back into the pan and mix frequently until it thickens. If you want make the sauce pop a little more add two drops of yellow food coloring
The sauce pre-food coloring and thickened.

With the food coloring added. A little really goes a long way.

4. Pour the sauce over the chicken and coat it evenly. Mmmmm.....

5. Serve with your favorite sides and ENJOY!

We usually serve this dish with rice and broccoli. Honestly the chicken is great base for any sauce or just as-is. The soy sauce marinade gives the chicken a really great seasoned flavor that makes it hard to resist eating the chicken on the spot (hard until the sauce is ready, anyway). The sauce is really sweet and has a great tang. It really is the best homemade takeout dish and better than what you find at a restaurant.


January 17, 2012

Cioppino


 If you live in California you know that we've had some of the sunniest weather during winter that we've had in a long time. I hear it's finally suppose to rain (which means snow in the mountains and possibly a future day trip *fingers crossed*) but until then we've been making-do with the sun during the day and the iciness at night! One of the things I couldn't wait for this winter was the opportunity to make soups, or in my case some Cioppino. I couldn't have picked a more suiting night because both of our colds started the night of making it, after that we were out of it for about a week. The soup was hearty, warm, and really really delicious and full of amazing seafood. You're sold right? Good! :)

We've made this before so I was able to make everything pretty quickly. The hardest part is not constantly tasting it while it's cooking.


What You'll Need:
Crab meat
1/2 p shrimp
1/2 p mussels
1/2 p small scallops
1/2 C olive oil
1 Tbsp garlic
1/2 of an onion
14 oz diced canned tomatoes
1 C of seafood broth
1 C of white or red wine
Parsley
3 to 6 oz of tomato paste
Fresh basil
diced chile pepper or cayenne pepper
Linguini or other thin pasta (optional)
Clam juice

We went to Whole Foods to get the mussels because I've never had a bad piece of seafood from them. But the best thing about this dish is that you can use whatever seafood you love, whatever is in season, or whatever you already have. It's a dish that has a lot of variations, would you expect any different from a dish that originated in San Francisco?

Cooking mussels is something that I had never done before making this dish but it's really easy now. Start by putting a small amount of water in a pot large enough to hold all of the mussels and keep it on low heat. After about 5 minutes the steam is going to allow the mussels to open. I only had to discard two because they didn't open, all the other ones opened and looked amazing. When you're done with this liquid strain it into a cup so you can use it later on. If the broth didn't make a cup you can add oyster juice to get it to a cup.

I cooked all of the shrimp and scallops the same way - in a small of amount of hot water because I had some bags of frozen, already cooked shrimp and scallops so they only needed to be defrosted. I checked them constantly to to make sure they weren't frozen so I could remove them from the heat as soon as possible. I knew that I'd be putting them in the hot soup later on so I didn't want them to over-cook. 
I ended up getting my seafood ready before I actually started making the Cioppino because I was in the middle of doing laundry. You could definitely get the shrimp and scallops ready early in the day and just store them in a zip lock bag in the fridge. I would wait to do the mussels though. I just think the longer they stay closed and cold, the better.

When you start the rest of the Cioppino then chop up your onion and saute it with some olive oil. When they start to get soft, add the chopped garlic and the chile pepper or cayenne. When I use a pepper then I leave them in halves so they're easier to take out after.... one of us doesn't always like the heat... If you're using cayenne then just add a little here because you'll be adding more later on.

When everything is cooked, add the canned tomato, the mussel broth, wine, and tomato paste. If you're using white wine I suggest more tomato paste (3 oz.) but less if using red. For this batch I used red, which is delicious but white wine will always have my heart (and therefore always be stocked in my fridge). This is also when you can taste it and see what it needs. I added the basil, parsley, salt and pepper. I also added some more cayenne because I wanted a little more kick. Let this cook for 20 minutes. Oh and don't forget that if you're adding pasta, you should cook it now too.

When the sauce has gotten thicker then add the seafood so that can heat up and absorb some of the flavor.

While everything is heating up cut a loaf of french or sourdough bread. I prefer sourdough but I'm a native Californian so it I just think it goes with everything. Any kind of "crusty" rustic bread will work - you just need it to soak up all of the awesome broth!

Once everything is warmed up and the noodles are done, you can either add the noodles to the pot or plate them first then use a ladle to spoon everything over the pasta. 

The Cioppino is a little spicy but full of seafood, tomatoes and a really rich broth that has the most amazing seafood taste. Mike loves this meal and was so happy when he came home from work and found it ready. And I don't blame him. This with a glass of wine deserves a big cheers! So CHEERS my fellow foodies! Enjoy!

January 16, 2012

Buffalo Wings and Spicy Seasoned Garlic Fries

Like most people know, the Superbowl is around the corner and even though I'm not a huge fan of football (unless it's the SF 49ers) I'm always a fan of an excuse for lots of food and drinks. Now don't get me wrong, this recipe can totally be made anytime of the year and I know you all will have no problem throwing down, I mean come on, THEY'RE BUFFALO WINGS!!! They're really great and spicy - just the way we like them. We use to go to this place in my hometown that had habanero wings that were completely delicious with a level of spiciness that could make you question your own sanity. These aren't even close to that but it's probably a good thing and the reason why we can make these more frequently. We also wanted garlic fries to go with our bar-food theme which ended up turning into seasoned spicy garlic fries. The recipe for those is at the bottom.

Buffalo Wings
What You'll Need:
1/2 C All purpose flour
1/4 tsp paprika 
1/4 tsp salt
10 chicken wings
oil for frying
1/4 C of butter
1/4 C hot sauce
garlic powder 
pepper 

Start by mixing the flour, paprika and salt. Toss the chicken in the flour mixture and let it sit the fridge for 60 to 90 minutes, or longer if you can wait that long. I read a lot of reviews online and they all said the same thing that I'm going to say - don't skip this step. It helps to make the wings more magical and I wouldn't want you to miss out on that.

When the wings come out they're ready for the 375 degree oil.

When the oil is ready shake off some of the flour from the wings to ensure you don't just burn it. Put a few wings in at a time and cook them for 10 to 15 minutes. Place them on a paper towel to absorb the extra oil.
 

Now it's time to get the sauce ready. And trust me, this is a glorious moment. There's a lot of flexibility with the sauce and the amount of spice that goes into it but one thing that should never be changed is Frank's RedHot Sauce! Just sayin'...

To get the sauce base down (that's what we'll call the simple sauce recipe that can be adjusted). Combine the butter, hot sauce, garlic, and pepper in a pot. After tasting it I added more hot sauce and a little paprika. Just a bit for some more spice.

When all of the wings are cooked and cooled I poured the sauce over them then tossed them around in a large bowl.

We also made some seasoned garlic fries because...well... we were hungry :)


 Garlic Seasoned Fries
The seasoned wings are super easy to make and are a really good addition. Besides they help keep with the theme of appetizer, easy-to-eat food that you could easily make for a game or just for fun.

What You'll Need:
8 cloves of garlic
6 Tbl of garlic olive oil
3 T cornstarch
1 1/2 tsp salt
1 1/2 tsp pepper
1/2 tsp garlic powder
1/4 tsp cayenne pepper

Start by cutting up a bunch of potatoes, pouring the olive oil on them and putting them in the microwave for 3 to 6 minutes.

 Combine the dry ingredients and toss with the microwaved potatoes.

Place them on an ungreased baking sheet and sprinkle the crushed garlic on them. Bake for 30 to 40 minutes at 225 degrees.

Delish right?

Serve them with the wings and a beer (or margarita if you're like me) and kick back. I promise you'll absolutely love these too!

December 13, 2011

Thanksgiving Catch-Up: Blogging Through the Holidays!

I literally have one more final left then I'm on vacation. I've taken a hiatus from blogging so I could focus on pre-final tests and papers, then finals themselves. As always I have soo much to blog but I wanted to let you know how my holidays have been. We're currently getting ready for Christmas (I'll be in full-swing Christmas mode when finals are done) but we've already had some of our traditions here: Thanksgiving being the first one. Mike and I both attended our families Thanksgiving dinners, then I attended my parents' dinner, then our personal one here at home. Three Thanksgivings. Yeah, I'm still full. I won't get into my recipes (except for one that I'll post later) so I'll just let you know what I was up to for my weekend-long feast.

On Thanksgiving day I woke up, watched the parade, then headed off to San Jose to see my family. We usually have that dinner pretty early because my aunts and uncles have dinner with their in-laws too and so on. There was no shortage of food there either.
My uncle and the newest member of our family - his grandson!

I had a great time with my family and enjoyed seeing everyone since it had been so long and I've moved pretty far.

On Friday it was also Mike's birthday (he's a Thanksgiving baby) so we had plans that night but my parents always have their own Thanksgiving for us the next day so I attended that too. This is the spread my mom had for us. It consisted of turkey, homemade stuffing, yams, homemade mashed potatoes, rice (because we're Mexican and we eat it with almost every meal), and cranberry sauce.
Yeah, I rocked this...

Our last Thanksgiving was on that Saturday. I started this tradition when Mike and I moved out last year so we could have our own leftovers. It's really what got me started in blogging again. I had forgotten how fun it could be to cook multiple items at once, and the pressure and satisfaction that comes with pulling it off. Folks, this is for you, I owe you one.This year I found out something about myself. I don't like turkey. I mean I'll eat it, but I usually go after all of the side dishes. And I realized the older I get, the lazier turkey makes me. It's just not my favorite thing, but I made one anyway. Along with my turkey I had stuffin' muffins, mashed potatoes, yams, rice, and a potato salad.

*Confession* I don't know the difference between sweet potatoes and yams and I honestly don't know which ones I made but they were good. Also, I'm sorry if my version differs from the traditional way, I don't know what that is either but feel free to let me know.

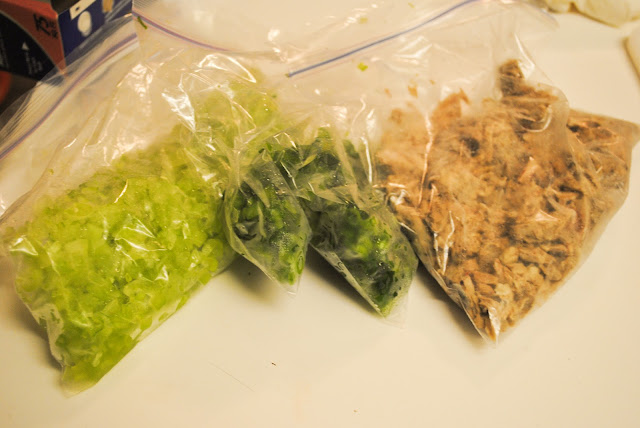
These are the ingredients that my lovely father chopped really really tiny for me. He's the best at it. These are bags of celery, green onion, and the turkey neck (let's all ignore the third thing together). I sauteed them in a bunch of butter then added a box of Stovetop stuffing and half a bag of plain stuffing. This is my secret. You're welcome :) unless you do it too.

For my potatoes I did the usual boiling of potatoes and whipped them with cream and butter (calories and I are good friends over the holidays).

My stuffin muffins ready to go....

My yams crushed up with crushed pineapple, walnuts, brown sugar and topped with mini marshmallows.

This is the first time we had this but we got them from Mike's dad. This is the exact recipe we used. Please try them - they're delicious and very unhealthy!!

This is the guest of honor. Not too bad huh? 

Not a bad feast for college students on a budget. We both really enjoyed it too. Don't worry I didn't forget about dessert! I'll be posting my Pumpkin Cheesecake recipe soon. See you all then. Cheers!