Pages

Showing posts with label Mexican. Show all posts

July 23, 2014

Turkey Stuffed Peppers

In this post I talked about clearing out my pantry and trying to use up any processed, boxed, go-to meals. One of the things that I had always turned to was Rice-A-Roni for side dishes. This recipe is a product of using the rice in a way that makes it more than just a boxed side. Besides also being a recipe you can use with regular rice and lots of seasonings, it tastes just as great with the Rice-A-Roni. I also use turkey because I don't eat a lot of red meat but it can be easily substituted with ground beef or black beans. What you get in the end is a filling, delicious, and guilt-free meal that is super easy to make!

What You'll Need:
3 large bell peppers
3 Tablespoons of vegetable oil
1/2 of an onion
1 pound of ground turkey 
1 teaspoon of cumin
1 teaspoon garlic powder
cheese
sour cream (optional)

What To Do: 

1. Start by preparing the rice per the directions on the box. You'll want to have this ready so you can add it to the turkey when it's done cooking. 

*If you use regular rice cook it beforehand by boiling it in chicken or veggie broth and season with cumin, garlic powder, and chili powder. 

2. Preheat your oven to 350 degrees and line a baking sheet with non-stick foil. Wash and cut your peppers in half (long-way). Use a spoon (or your hand) to pull out the center of the bell pepper and dispose of the seeds. Place them on the baking sheet and set aside. 

*This recipe gives two people three halves or three people two with a side.

3. In a large pot or pan heat up your oil. Brown your turkey for about 5 minutes. While that is cooking, chop your onion and then add it to the turkey. Add a the cumin and garlic powder and let the meat finish cooking. Drain the meat if there's a lot of liquid so it doesn't make the rice soggy. 

4. Add the cooked rice to the turkey mixture and mix it all together. 

5. Fill the peppers with the turkey and rice mix and cook for 10 minutes. Add cheese to the tops of the peppers and then bake for another 3 minutes so the cheese can melt. 

6. Serve with a dollop of sour cream and salsa and ENJOY!


January 22, 2014

Tortilla Soup

This is one of my favorite recipes! I could eat this soup in the dead of winter or in the hottest times of summer and be just fine. I love the textures of the crispy tortilla strips, the savory and spicy soup, the creaminess of the melted cheese, and the freshness of the cilantro! Yummm.... Okay I'm officially ready to make this again! This is also great because you can customize it however you like and add more of your favorite toppings.

What You'll Need: 
8-10 corn tortillas
1/4 cup of oil 
1 small onion (chopped)
2 cloves of garlic
1-2 serrano peppers (seeded and finely chopped)
4 cups of chicken broth
1 can diced tomatoes (with juice)
salt and pepper
garlic powder
1 rotisserie chicken 
1/2 cup of Mexican blend cheese 
2 limes

What To Do:

1. Preheat your oven to 350 degrees. Line a large baking sheet with non-stick foil.

2. Start by cutting your tortillas into strips. I usually make 6 strips then cut them in half. I think those are the best size pieces for the soup. Put them on the baking sheet, lightly salt them, and bake for 10 minutes.

3. Next, take off the skin and shred all of the white meat from your rotisserie chicken. You don't want the pieces too big, just bite size.

*You can also use a regular chicken breast by boiling it in water or chicken broth with some chili powder, garlic powder, pepper, and Season All. Boil until center of chicken reaches 160 degrees then shred like normal.

4. When the tortilla strips are done, set them aside in a bowl and put the shredded chicken on the same cookie sheet and bake for 8 to 10 minutes. I do this because it dries the chicken out a little and it ends up holding up to the soup a lot better.

5. Now for the soup. Heat up the oil in a large pot. Add the onion and cook for 3 minutes. Add the garlic, peppers, and a bit of salt to the onions. Cook everything for another 3 minutes, stirring frequently.

**Make sure you wear gloves or wash your hands really well after handling the peppers (this comes from experience...) I'm also never good at judging whether the peppers are going to be spicy or not but I like spicy so I always go for two. If you go for three, let me know how it turns out!

6. Add the broth and tomatoes and boil for 15 minutes. Season with salt and pepper and a little garlic powder. Then add the chicken and let it all simmer for another 5 minutes.

5. Top the bowls of soup with tortilla strips, cheese, and cilantro (it's quite possible that I add too much cilantro but I'm totally okay with that). Squeeze some lime over everything and ENJOY!

***Avocados are also great with this soup if they're in season


September 11, 2011

Tortilla Soup

--I dedicate this post to anyone that was affected by the events of September 11, I hope I can help you smile today.--
Lately I've definitely been on the lookout for the first signs of fall. Then I got my first one, sort of. I came home from work and realized that it was extremely overcast outside (I think from a nearby fire, but overcast nonetheless) so I thought it was the perfect opportunity for soup. I've made this one previous time and it was just a big hit so I couldn't wait to make it again. The steps are super easy and everything comes together really, really well.

What You'll Need:
1 whole rotisserie chicken
2 cans of chicken broth
6 corn tortillas
1 large chile (or 3 small ones)
1 medium onion
1 can of diced tomatoes 
1/4 C of vegetable oil
3 Tbl garlic
1/2 tsp salt
2 1/2 C shredded cheese
1/2 bushel of cilantro

Start by preheating your oven to 350 degrees and lining a large cookie sheet with foil. Get your tortillas and cut them into bite-size strips and spread them on the the cookie sheet, trying not to overlap them too much. Let them bake in the oven for about 8 to 10 minutes or until crispy.

Next, chop up your entire onion. You don't want the pieces to be too small in this because they add texture to the soup. Go for medium size pieces. 

In a heated saute pan add the oil and the onions. Saute the onions until they become translucent. While they're cooking cut the chile and garlic if you're using fresh garlic. You can use any kind of chile you want for this. If you like a lot of spice use a jalapeno in place of one of your chiles. I got my pepper in my Farm Fresh to You delivery so I used that. My soup didn't end up spicy at all (which is probably good considering it wasn't exactly cold outside) but it still gave the soup the taste of the pepper. When the onions are ready add the peppers and the garlic to them. Let those saute too.

By now you're tortillas should be done. Take them out of the oven but leave the oven on. While they're still on the cookie sheet sprinkle a little salt on them. Not a lot, just enough to give them some extra flavor. Let them cool then place them in a bowl and set aside.Set the cookie sheet and foil aside for later.

Your saute mix should be done or close to done at this point. When it is, open both cans of chicken broth and pour them into a big measuring cup. You should get about 4 cups of broth, but if you're short then fill the rest up with regular water. Pour in your entire can of tomatoes too - juice and all!

Bring your broth/tomatoes to a boil on medium heat. While you're waiting it's time to work on the chicken. Things between you and the chicken are about to get a little personal so be forewarned. If you have a problem with this you can buy shredded chicken from the store (but that sounds kind of gross) or you can boil or shred your own chicken (but that sounds like extra work). I used the rotisserie chicken because it's already cooked, it's already seasoned, and it's super easy!

You're going to need about 2 1/2 cups of chicken. The chicken doesn't necessarily need to be shredded, but it needs to be in pieces. Start this by taking off the skin on the breast and discard, you'll want to use mostly the breast meat. Use a fork or your fingers to pick the meat off. You'll get enough from the breast meat that you won't need to use the drumsticks so cut those off and freeze them for another meal. When you have what you need, put the shredded chicken on the same cookie sheet and foil you used for the tortillas. Put the chicken in the oven for about 7 minutes. I do this because it helps dry out the meat a little so it doesn't get soggy in the soup. I use the same foil as the tortillas because the chicken will pick up any of the extra salt you sprinkled on the tortillas after they came out so they chicken stays flavorful. See, I got your back.

If you're thorough enough (if you take a long time like I do because you're also watching TV) then you're soup should be boiling by now. When your chicken is done put it in the soup.

Let everything simmer together for 5 minutes. You can chop your cilantro while this simmers.

When everything ready to plate (or bowl) then use a ladle to pour your soup into two bowls. Grab a handful of your tortilla chips and put them on top of the soup. Top your soup with cilantro and some cheese and serve right after.
There is something magical about this soup. It's not like a lot of other soups that are creamy and comforting in that way. The actual soup part is SOO flavorful with the onions and chile then you get a crunch from the tortillas and it works so well. The chicken isn't dry or mushy and the cilantro...well it's essential! I promise you'll be so full from eating this soup but you wont want to stop. Tell me that's not what cooking is all about?

August 31, 2011

Traditional Mexican Rice

This is also known as Spanish Rice to a lot of people. I'm not sure about the origins of it, but I know I'm Mexican and this is my rice. No matter what, you're going to die over how flavorful this rice is. I'm not a huge fan of white rice (I know some people swear by it) so I end up making this kind of rice the most. It's perfect for enchiladas, taquitos, or in this case, my grandma's tamales! Speaking of, my grandma and mom would be so proud! I was taught by the best and now I make it for Mike whenever I can. When I was growing up my grandma would make this rice for all of our family parties and holidays. Now, I pass my traditions onto you.

As a side note, this recipe is near and dear to me, not only because it's been passed on, but because this is one of the first things I learned how to make on my own. I loved how things weren't really measured to make it taste good (unlike baking where you measure everything). I could add a couple dashes of this and that and things would turn out, not only un-ruined, but extremely delicious. I hope you enjoy it too!

What You'll Need:
1/2 of an onion
1 tomato
1 cup of white rice
2 cups of water
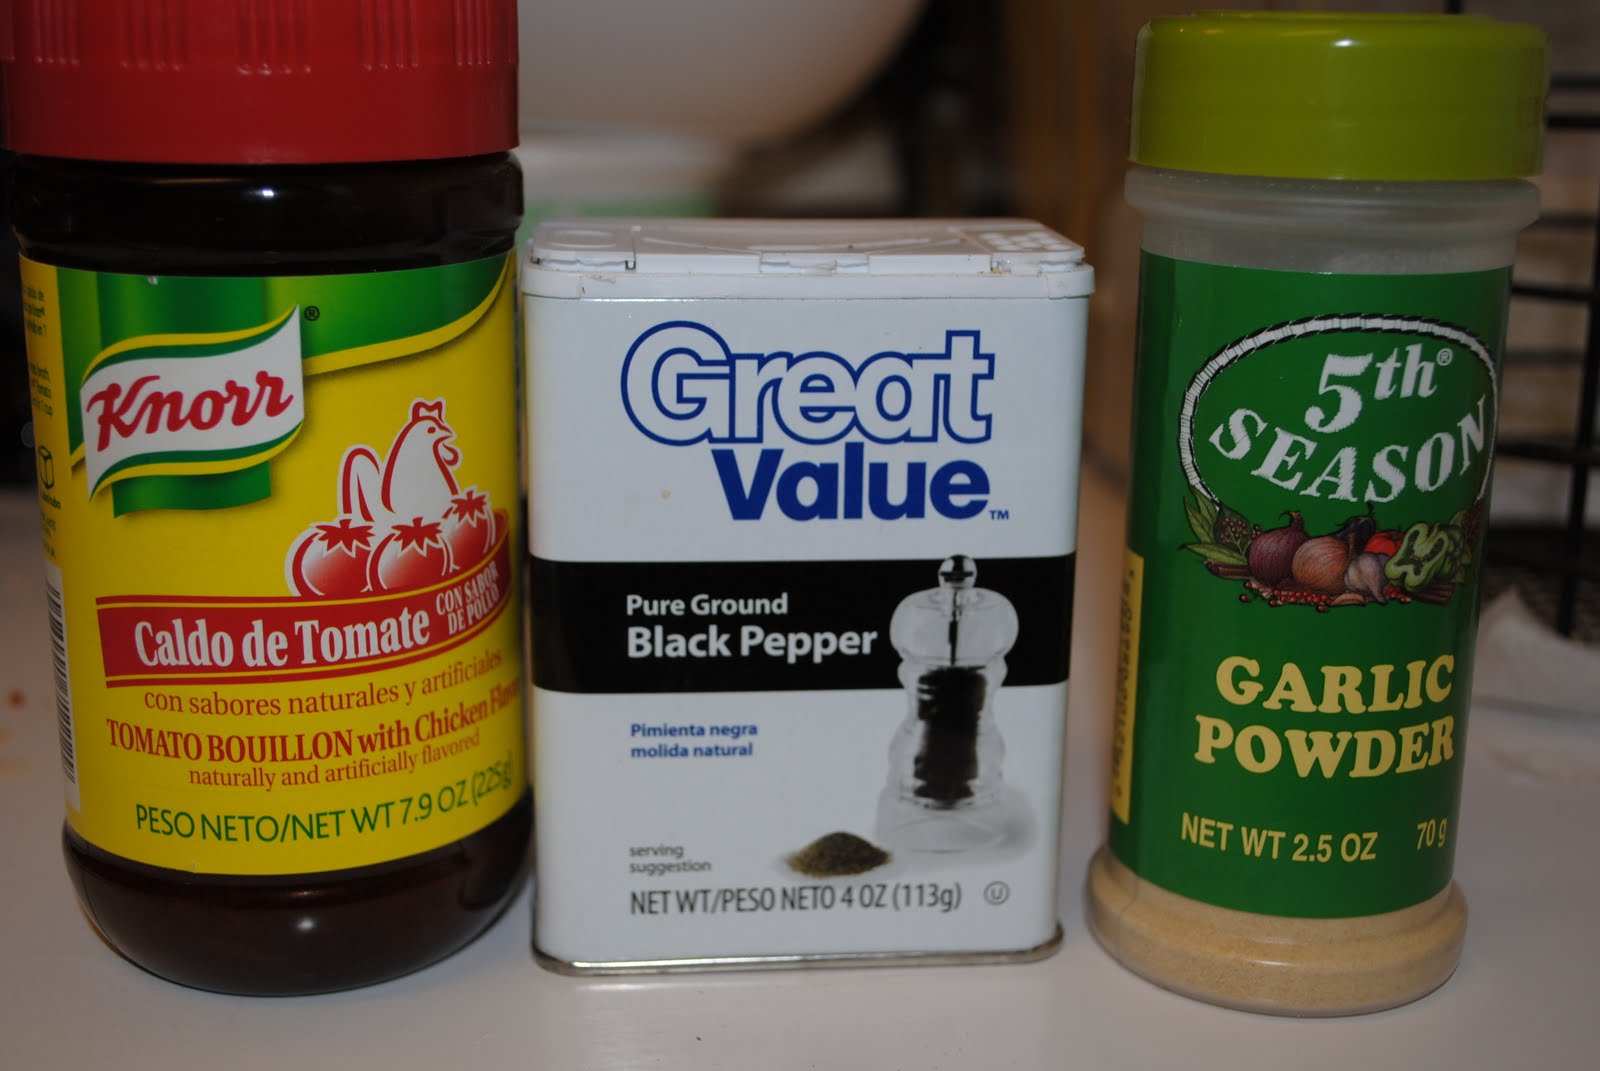
Tomato Bouillon (Caldo de Tomate)
Garlic powder
Black pepper
Vegetable oil

This whole process is really easy and feeds 3 people (or 2 if you want more to yourself). Start by browning your rice in a large saucepan over medium heat. Just drizzle your pan with vegetable oil and add your cup of rice.

While the rice is browning, dice your onion and tomato and set aside.
This is going to be soo good
Make sure you keep an eye on your rice because you don't want it to burn. Now, it's mandatory you take in the smell of your rice cooking - it smells so good right? (Focus Monica) Okay, your rice will be done when it's a nice golden color. When this happens, it's time to add the tomato and onion.

Let the onions and tomato get soft, it should take a few minutes. You'll notice that the rice will get a little orange tint from the tomato. When it's ready add your water. This part is really really important - this is where you add all the flavor.

These are all the ingredients you'll need to flavor the rice - three things. Can you believe it? You can't beat the simplicity.

 Add about a tablespoon of tomato bouillon. If you add too much you're rice will end up really salty. Mix it around and taste it. Make sure you add as much as you feel comfortable with (like I said, I usually one tablespoon - or a big spoonful). I go by the taste and color of the water to tell when it's done (just like grandma). Whatever your water tastes like, your rice will taste like when it's done.

Now add some pepper and garlic powder. I don't have measurements for this, so if I HAD to say how much I would say about 9 shakes of pepper and 3 of garlic powder. Now, stir and taste. See how you like it. I don't add a lot of salt to the things I cook but if you're like Michael and you can't get enough it, go ahead and add some.

When everything is mixed, cover your rice.


I also don't have a time for how long you should cook this. If your rice is on medium heat then it should take about 15 minutes. Keep your eye on it though. If the water looks like it's almost gone taste the rice and if it's still crunchy then add about a 3/4-1 cup more water. Depending on how much longer your rice needs to cook, put the lid back on.
As you can see below, when the water was almost gone for mine, the rice still wasn't as soft as I like it so I added about 1/2 a cup and put the lid  back on. About 7 minutes later (I know this is random time to get specific) I took the lid off and let the rice cook.
1 more cup of water added.
After about six more minutes with the lid on and then a few with it off, and stirring constantly, my rice was done. One thing about the stirring, make sure it's more of a folding because you don't want to mush up your rice by over-stirring. It'll still taste good, but it'll be mush and that's not good eats.

I also heated up some leftover tamales in the oven at 350 degrees for 20-25 minutes flipping them every 8 minutes (hopefully I can get a post up when we make them over Christmas).

When everything was done we were able to eat. I think there were long moments of silence from us while we ate. It was so worth it!...

August 24, 2011

Double Decker Tacos

I've been on a beef-kick lately. We don't get to eat it often, but I had half a pound of organic ground beef to cook and I decided to make one of Mike's favorites - Double Decker Tacos! Oh my goodness, oh my goodness they're delicious! They're not hard to make and you can get three tacos a person with my recipe. 

What You'll Need:
1/2 pound Ground beef
2 T Taco seasoning
6 Hard taco shells
6 Flour tortillas
1 can Refried beans
1 Tomato (for topping)
Shredded cheese (for topping)
Shredded lettuce (for topping)
Sour cream (for topping)

This is my nifty way of storing taco seasoning. The way this came about was a sale at the grocery store that allowed me to buy like ten packets of seasoning. Well, I didn't feel like storing a bunch of packets of taco seasoning and I had a lot of these jars laying around from a party I went to and decided to put them to good use. I cut out the directions from one of the packages and taped it to one of the jars. I now have only two small jars of taco seasoning in my cupboard - instead of the ten I would have.

I'm very cautious about the handling of meat (I'm not a fan of bacteria and the sickness it can cause) but this is good because all you have to do is put the hamburger meat in a hot pan. But please wash your hands still. I put some oil in the pan to help the meat brown but depending on the meat and the the amount of fat in it, you may not need to add any extra oil.

Let the meat brown over medium-high heat. While this is happening, get your taco seasoning mix ready. Just follow the directions and the back of the package (or jar). I cut the amounts of seasoning in half because I was using half the amount of meat that the package accounted for. I used about 2 T (tablespoons) of seasoning and around 1/3 C of water.

When the meat is brown, drain any fat that may be in the pan. I usually use a splatter screen so that way I drain all of the oil but don't lose any of the meat. Trust me it works. Put the pan back over medium heat and add the seasoning mix.

This is going to take a few minutes so get whatever you use to heat tortillas warmed up, and warm up six flour tortillas. Store them in a tortilla warmer or between two kitchen towels.

You can also get the refried beans heated too. All you need to do is heat them on low heat. Stir them a lot so they don't overheat and splatter everywhere - because that will happen. Take out your hard taco shells too. You can make your own, but that's so much work - pre-made ones will be just fine.

When the meat is done (there's no more water) then you're ready to assemble the tacos. First get a warmed flour tortilla and spread some beans on it. You won't need a whole bunch but get enough on there so it'll stick to the hard taco shell.

Place the pre-made shell in the flour tortilla.

Add the meat.

Add the cheese.

Now you can add any taco toppings you like. We like lettuce, sour cream, and tomatoes. Mmmmm.... They may not be the most sophisticated looking tacos but they're delicious, crunchy, and gooey... and I was really hungry at this point so oh well. Enjoy!!