Pages

July 23, 2014

Turkey Stuffed Peppers

In this post I talked about clearing out my pantry and trying to use up any processed, boxed, go-to meals. One of the things that I had always turned to was Rice-A-Roni for side dishes. This recipe is a product of using the rice in a way that makes it more than just a boxed side. Besides also being a recipe you can use with regular rice and lots of seasonings, it tastes just as great with the Rice-A-Roni. I also use turkey because I don't eat a lot of red meat but it can be easily substituted with ground beef or black beans. What you get in the end is a filling, delicious, and guilt-free meal that is super easy to make!

What You'll Need:
3 large bell peppers
3 Tablespoons of vegetable oil
1/2 of an onion
1 pound of ground turkey 
1 teaspoon of cumin
1 teaspoon garlic powder
cheese
sour cream (optional)

What To Do: 

1. Start by preparing the rice per the directions on the box. You'll want to have this ready so you can add it to the turkey when it's done cooking. 

*If you use regular rice cook it beforehand by boiling it in chicken or veggie broth and season with cumin, garlic powder, and chili powder. 

2. Preheat your oven to 350 degrees and line a baking sheet with non-stick foil. Wash and cut your peppers in half (long-way). Use a spoon (or your hand) to pull out the center of the bell pepper and dispose of the seeds. Place them on the baking sheet and set aside. 

*This recipe gives two people three halves or three people two with a side.

3. In a large pot or pan heat up your oil. Brown your turkey for about 5 minutes. While that is cooking, chop your onion and then add it to the turkey. Add a the cumin and garlic powder and let the meat finish cooking. Drain the meat if there's a lot of liquid so it doesn't make the rice soggy. 

4. Add the cooked rice to the turkey mixture and mix it all together. 

5. Fill the peppers with the turkey and rice mix and cook for 10 minutes. Add cheese to the tops of the peppers and then bake for another 3 minutes so the cheese can melt. 

6. Serve with a dollop of sour cream and salsa and ENJOY!


July 21, 2014

Banana Oatmeal Pancakes

One of my favorite things about breakfast is that it's so versatile! Whether you're in the mood for something sweet, savory, healthy, indulgent, or a mix of everything you can get it for breakfast. Now, I love pancakes as much as the next person, but they're one of those foods that always leaves me feeling overly full. Who wants to start their day that way? (Probably the same people who would actually be willing to give up pancakes!). I decided to go for a healthier version of pancake that has no flour, no sugar, and no guilt. I got it off Pinterest a long time ago and was drawn to it again after going through some of my old pins - and having a craving for pancakes. These pancakes are a healthy alternative that don't actually taste like an alternative. These are the best option for those days that you feel like a big breakfast without wrecking the rest of your day!

What You'll Need:
2 eggs
1 banana (mashed up)
1/2 cup of oats
1/4 cup of applesauce
1 teaspoon of vanilla
1/2 teaspoon of cinnamon

What To Do:

1. In a food processor, grind up your oats until it turns into a fine powder. I used a Nutribullet because I have a special blade for this sort of thing but a magic bullet would work too.

2. Mix all of your ingredients in a bowl, being certain to fully incorporate the oat powder. 

3. Spray a skillet with non-stick cooking spray. Ladle about 1/3 of a cup of the batter into the pan. Once bubbles start to form on the non-cooked side it should be okay to flip.

*If you want to add things to the batter (i.e. fruit, nuts, chocolate chips, etc.) then you can add it to the raw side of the pancake before you flip it. 

4. Once the other side of the pancake is golden brown, serve immediately. 

5. You can use regular maple syrup (like I did) or you can garnish with fruit, walnuts, or whipped cream. Serve with some eggs and turkey bacon (or "Fakon" if that's still a thing) and you have yourself a fabulous, guilt-free, breakfast! ENJOY!


July 19, 2014

Blueberry Muffins

My favorite part about summer is the excessive amount of fruit that's in season. I went a little crazy the other day buying all of my produce and when I found that the blueberries were on sale I bought 2 pounds of them. Ashamed? Absolutely not! Well, at least not until I realized how much I had to eat. After about a week-and-a-half I still had about 1/3 left and knew I had to act quickly before they went bad. Enter said muffins.

I'm still not big on baking - especially early on a Saturday morning, but I was willing to allow it for the outcome of homemade muffins! Oh these are so incredibly delicious and pretty easy to make. I got the recipe from Sally's Baking Addiction and didn't need to change much. I skipped the extra sugar on top because I figured I would have enough sugar in the coffee I would inevitably be pairing these with and found that they were just a good without it. I don't think I'll ever go back to boxed muffin mix again!

What You'll Need:
3 cups of flour
4 teaspoons of baking powder
1/2 teaspoon of salt
1 teaspoon of cinnamon 
2 eggs
1 cup of sugar
1 cup of buttermilk (or 1 cup of milk + 1 tablespoon of vinegar)
1/2 cup of oil
1 teaspoon vanilla
1 1/2 cups of fresh or frozen blueberries

What To Do: 

1. Start by pre-heating your oven to 425 degrees. Don't worry, you're going to lower the heat after five minutes of baking. 

2. Carefully measure all of your dry ingredients and mix together in a large bowl. (You'll be adding the wet ingredients to this).

3. In another bowl, mix the sugar and eggs. Add the rest of the wet ingredients to the eggs and sugar. 

4. Combine the wet ingredients with the dry ingredients and make sure the flour is thoroughly incorporated. When it is, carefully fold in the blueberries. 

5. Line or spray your pans and fill each spot to the top with your mix. 

6. Bake at 425 for 5 minutes. Then for another 13 minutes at 375. Don't worry about taking the muffins out while the oven is cooling. When they're done leave them in the pan for another minute, then place them on cooling racks. 

7. Let them cool for a bit, but they're better when they're nice and warm with a little bit of butter (and the coffee of course!). ENJOY


January 31, 2014

Granola Clusters

Raise your hand if you're still keeping up with your New Year's resolution. Be honest, now. I have to admit that I got a slow start to mine but I'm still going. After all these years I've finally added the "eating healthy" resolution to my life. It's all part of making a better, happier me. I adapted this recipe from Cookies and Cups after needing more healthy snack and dessert options. Nothing is worse than working out or doing really good with your daily diet and feeling like you ruined everything with an unhealthy snack. Enter GRANOLA CLUSTERS! These little clusters are perfectly crunchy and just sweet enough and fill you up quicker than other junk food snacks! My favorite part was that even though there are quite a bit of ingredients, this recipe is so customizable that you could mix and match the ingredients with things that you have. Here's to us and our New Year's Resolutions!

What You'll Need:
2 1/2 cups oats (not instant)
1/4 cup melted butter
1/4 cup brown sugar (firmly packed)
1/4 cup honey
1/2 cup dried cherries
1 cup flaked coconut
2 cups corn flakes (lightly crushed)
1/2 tsp salt
1/2 chopped walnuts
1 beaten egg white

What To Do:

1. Preheat your oven to 300 degrees.

2. Line a large cookie sheet with non-stick foil or parchment paper and set aside.

3. In a large bowl mix all of your ingredients together. It's sort of a running joke between Mike and I that I never mix things in large enough bowls. So, my friends, use a LARGE bowl because there are a lot of ingredients.

*Spray your measuring cup with a little cooking spray in order to get all of the honey out of it.

4. Put the mixture on you cookie sheet and spread it around evenly.

5. Bake the granola for 25 minutes then turn off your oven but keep your granola in there until the oven cools. This was a great tip from Shelly (author of Cookies and Cups) that makes all the difference in how crunchy your granola gets.

**Her blog also has good tips on how to get less crunchy granola if that's not really your thing.

***As I mentioned, there are a lot of things that would go great in these. I happened to only have walnuts and dried cherries, because I love to snack on them, but cranberries, raisins, almonds, chocolate chips, or a mix of all of these would be a great addition. 

6. Once it's cooled start to break off pieces. The bottom will form a sort of crust that keeps everything together and is insanely delicious.

7. Save the mix in a air-tight container and enjoy throughout your day!


January 22, 2014

Tortilla Soup

This is one of my favorite recipes! I could eat this soup in the dead of winter or in the hottest times of summer and be just fine. I love the textures of the crispy tortilla strips, the savory and spicy soup, the creaminess of the melted cheese, and the freshness of the cilantro! Yummm.... Okay I'm officially ready to make this again! This is also great because you can customize it however you like and add more of your favorite toppings.

What You'll Need: 
8-10 corn tortillas
1/4 cup of oil 
1 small onion (chopped)
2 cloves of garlic
1-2 serrano peppers (seeded and finely chopped)
4 cups of chicken broth
1 can diced tomatoes (with juice)
salt and pepper
garlic powder
1 rotisserie chicken 
1/2 cup of Mexican blend cheese 
2 limes

What To Do:

1. Preheat your oven to 350 degrees. Line a large baking sheet with non-stick foil.

2. Start by cutting your tortillas into strips. I usually make 6 strips then cut them in half. I think those are the best size pieces for the soup. Put them on the baking sheet, lightly salt them, and bake for 10 minutes.

3. Next, take off the skin and shred all of the white meat from your rotisserie chicken. You don't want the pieces too big, just bite size.

*You can also use a regular chicken breast by boiling it in water or chicken broth with some chili powder, garlic powder, pepper, and Season All. Boil until center of chicken reaches 160 degrees then shred like normal.

4. When the tortilla strips are done, set them aside in a bowl and put the shredded chicken on the same cookie sheet and bake for 8 to 10 minutes. I do this because it dries the chicken out a little and it ends up holding up to the soup a lot better.

5. Now for the soup. Heat up the oil in a large pot. Add the onion and cook for 3 minutes. Add the garlic, peppers, and a bit of salt to the onions. Cook everything for another 3 minutes, stirring frequently.

**Make sure you wear gloves or wash your hands really well after handling the peppers (this comes from experience...) I'm also never good at judging whether the peppers are going to be spicy or not but I like spicy so I always go for two. If you go for three, let me know how it turns out!

6. Add the broth and tomatoes and boil for 15 minutes. Season with salt and pepper and a little garlic powder. Then add the chicken and let it all simmer for another 5 minutes.

5. Top the bowls of soup with tortilla strips, cheese, and cilantro (it's quite possible that I add too much cilantro but I'm totally okay with that). Squeeze some lime over everything and ENJOY!

***Avocados are also great with this soup if they're in season


January 16, 2014

Spicy Shrimp Pasta

This is one of my favorite types of meals for three reasons. The first is because I'm such a huge seafood lover! And especially with shrimp because I'll eat it however it's brought to me. The second is that I love pasta in tomato sauces. I'm pretty sure I could eat spaghetti every other day and be perfectly happy. The third reason is that I love spicy foods. Every now and then I'll challenge my pallet with some habanero wings or really spicy salsa, but I much prefer the types of foods that make you say "Hey! That has a good kick to it!"  And this meal delivers on that. In fact, it delivers on all three of these things. The pasta and shrimp are in a creamy tomato sauce that has just the right amount of heat and is really full of flavor.

What You'll Need:
1/2 pound of linguini or spaghetti
1/2 pound of shrimp
3 Tablespoons of butter
1/2 of a large onion (copped)
4 cloves of garlic (finely chopped)
1 14 oz. can of diced tomatoes (drained)
1/2 cup of dry white wine
4 oz. of tomato sauce (half of the little can)
1 cup of heavy cream
1 packet of dried peppers (like the kind that come with pizza)
dried oregano
dried basil
garlic powder
salt and pepper to taste

1. Start by boiling your water with a couple tablespoons of salt. Nothing is worse than forgetting that you still have to cook your pasta when your sauce is almost ready. Am I right?

2. If you're using fresh shrimp then I recommend peeling, deveining, and washing it before you get your sauce ready just so things will run more efficiently later on. I used frozen pre-cooked shrimp so I defrosted them by running them under warm water and taking off the tails.

*Frozen shrimp is a really easy way to add protein to your meals. They're easy to prep and you can use however much you like for any dish and put the rest back in the freezer.

3. To start the sauce, melt the butter in a medium sized pot or wide pan. Add the onion and saute for a few minutes then add the garlic with a dash of salt and cook for another minute so the garlic doesn't burn.

4. I have found this is the best time to add the pepper flakes. If you like really spicy foods then I would say two packets definitely the way to go. I like to taste it at this point and see what it needs. Just let the seeds let out some of the oils over medium heat. Right when things are getting spicy (and everything is, trust me) add the wine and let it cook off. 

**It's always a good idea to save those little pepper packets that you get when you order pizza (admittedly we have quite a few). Open them and add them to a shaker for easy access or store them in the packets and you have an easy way to add a little spice to any pasta, chicken, or casserole dish!

5. Now, add the canned tomatoes and the tomato sauce to the onions. I only used half of the small can of tomato sauce to compensate for the drained tomato juice but if you like a more "tomtoey" flavor go ahead and add more.

6. Add the cream and carefully stir it all together; letting it simmer on a medium-high heat.

7. As the ingredients are starting to come together, add the other seasonings.  Some days things just need more oregano or pepper than other days so it really depends on how much you like those flavors. Also, if you only used one packet (or a dash) of pepper flakes and want it spicier then you can still add more at this point. The spiciness will be slightly more mild, but still as delicious.

8. Now for the fun stuff! Add the shrimp to the sauce and let it cook or heat up. It'll only take a few minutes.
 
9. Drain your pasta and plate immediately onto giant pasta plates (or regular pasta plates if you're not obsessed like I am). Use a ladle to spoon the spicy shrimp tomato sauce onto the pasta. Top with some parmesan cheese.

10. Serve with a glass of wine and ENJOY!


Cake Mix Biscotti

I feel like so many people have been trying to kick the processed foods out of their life. This makes me so happy! Being one of those people who actually can't stomach overly process foods the way I used to, I'm glad to come across more and more recipes that show ways to make this easy and be able to share recipes that can help others do the same. This recipe actually constitutes as semi-homemade rather than from scratch but there's a reason why. About 6 months ago I got pretty fed up with the "food" that was in my pantry. Boxed noodles, potatoes, brownies, cakes, rice, and so on - I had it all! I finally donated all that food because I wasn't eating it anymore and I had found really amazing substitutions that I actually preferred more. HOWEVER I kept a few things (like my boxed cake mix) to see if there was anything I could make with it, besides cake. I decided to make biscotti instead. That's how this cake mix substitution came to be. This is a fun way to clear your pantry of that processed powder you have in your pantry or cupboard and bring new life into foods that you're slowly trying to work your way out of.
What You'll Need:
1 box of chocolate cake mix
1 cup of AP flour
2 eggs
1 stick of butter (melted)
1/4 C of water
Chocolate for drizzling (optional)

1. Preheat your oven to 325 degrees.

2. Combine all the ingredients in a bowl and make a dough. I know it sounds like a lot of butter but it's totally worth it, I promise!

3. Divide dough into two pieces and place on a lightly floured work space.

4. Flatten each piece into a rectangle - 1" thick and 3" wide. You'll end up with two rectangle-shaped chocolate dough pieces. I know you can tell this is going to be good!

5. Bake each rectangle for 25 minutes on a foil lined baking sheet, until it firms up then let cool for a few minutes or until it's cool to the touch.

6. Slice each piece into 1.5" thick pieces and place back on a baking sheet. You'll end up with around 14 pieces. Bake for another 15 minutes to make them really crunchy.

7. Let them cool and drizzle with chocolate or a little powdered sugar. I chose to omit this process because I figured I had my calorie intake for the moment. Sure does sound good though!

8. Serve with coffee and ENJOY!

*Some delicious add-ins are walnuts, dried cherries, or chocolate chips!


January 8, 2014

Vegetable Soup

I made this soup right before the chaos holidays started because the weather definitely called for it. The weather has progressively gotten worse and it's made me think this is the perfect time to share my soup recipe. I started making veggie soup as a way to get one of my favorite meals without all of the extra garbage that comes in the canned soups. I have wanted no part of the condensed, salty, unfilling soup that I used to love - especially when I figured out the secret. The veggie soup I make is really easy and, as far as soups go, doesn't take too long. It's adapted this soup from a Zucchini and Potato Tomato Soup recipe from The Little Kitchen food blog. I've made some changes to fit what I like in soup but I'll always be glad I found this recipe.

What You'll Need:
1/2 pound of small noodles (ex. mini conchiglie)
1 1/2 Tablespoons of olive oil
1/2 diced white onion
3-4 medium sized potatoes (peeled and chopped)
2 zucchinis (quartered)
14 oz. can of diced tomatoes (with juice)
2 15 oz. cans of chicken broth
1 teaspoon black pepper
1/2 teaspoon of garlic powder
2 Tablespoons of dried oregano 
1 Tablespoon of dried basil 
1 can of whole kernel corn (drained)
Salt to taste

1. Start your pasta water. It's the worst to forget about this part so it's best to get it out of the way.

2. Add the olive oil to a large pot on medium heat then add the diced onions and stir occasionally. As these are cooking dice your peeled potatoes into small chunks. Remember that they'll cook better if they are the same size.

3. Once you add the potatoes, make sure to stir them constantly. All of the starch will make them stick so keep an eye on them while you cut the zucchini. For the zucchini, start by cutting of the ends, then slice the zucchini long way so you have two halves. Then cut those halves to get quarters. I suppose you could dice them so they would be the same size as the diced potatoes but I they do tend to get pretty soft by the end of the cooking process and you don't want zucchini mush in your soup. Unless you do of course. You're better of making sure everything is cut even. 

4. Add the zucchini to the potatoes and onions and let cook for about three minutes. 

5. Now is the time where this goes from cooking some garden veggies to really making it a delicious soup! Add your can of tomatoes and let them incorporate with the other veggies for a minute or two - just long enough for you to get your herbs and do the "revival" method. This is just the part where I put the dried herbs in the palm of my hand and rub my palms together so that it really wakes of the flavors of the herbs and they don't taste like they've been sitting in a plastic container in your cabinet for far too long. 

6. Stir everything and make sure all of the herbs are good to go. 

7. Add your chicken broth and let it come to a boil. Turn the heat to medium-low and let it simmer for about 15 minutes. Carefully taste the broth and see if it needs any more seasonings.

8. At this point your pasta is probably ready or close to it. Make sure to drain AND rinse it. The potatoes are starchy enough to thicken everything and pasta starch isn't necessary. FYI this is the pasta I used. I use a lot of products from this brand and I love it. I didn't even know they made this size bag until I went looking for something to add to this soup. I think it was 80 cents. Not bad huh?

9. After about 15 minutes the potatoes should be fairly soft. If you taste them be really careful! Those suckers are hot! Add the corn (drained) and the pasta. Add any salt and pepper to taste. That's it. You'll either have enough to feed four or enough for two meals for two. I like to serve this with my no-knead white bread but it doesn't need it. I hope you enjoy!

December 20, 2013

Snickerdoodles

 Everyone loves a good Snickerdoodle cookie. Now that I've finally made them, I'm hearing from everyone that these are their favorite cookies. I have to admit that I was never a huge fan. I think I finally had my first Snickerdoodle a year ago, and it was only a bite. There was no real reason for me to not like them - especially because I'd never had one. But I mean how can anyone not like a good sugar cookie covered in cinnamon and sugar? But I finally cracked and decided to surprise Mike with a batch for his birthday a few weeks ago because, of course, they're his favorite cookie. You know me, I'm not the biggest fan of baking but the recipe I found was super easy. I used a recipe I found online (thanks Sue W.) and it'll probably always be the recipe I use. I've used this recipe once more since then and they came out fabulous yet again so I knew the recipe was worth sharing.

What You'll Need:

1 1/2 C white sugar
1/2 cup butter
1 teaspoon butter (softened)
1 teaspoon vanilla extract
2 eggs
2 3/4 all purpose flour
1 teaspoon cream of tarter
1/2 teaspoon baking soda
1/4 teaspoon salt
2 Tablespoons white sugar
2 teaspoons ground cinnamon

What to Do:

1. Start by preheating your oven to 400 degrees.

2. Then, in a large bowl, beat the sugar, eggs, vanilla, and softened butter. If you're fancy and have a nice mixer... well, then I'm jealous. I just use my good, old-fashioned hand mixer which I think is on it's last leg. Anyway. Make sure everything is mixed really well. (Tell me, is this not the best start to any recipe ever??

3. Once it's nice and mixed, add the flour, cream of tarter, baking soda, and salt to the bowl. I've only ever tried the recipe with cream of tarter but reviews I read said that you don't absolutely need it. I now have a little container full of it that have no idea what to do with. Maybe I'll make meringues... or more Snickerdoodles.

4. Mix everything until the dough forms. If you're a rebel and eat raw cookie dough on occasion, you 1) are like me and 2) NEED to try this.

5. Next, in a small bowl you'll want to combine the cinnamon and sugar so you can coat the cookies.This is what makes the Snickerdoodle a Snickerdoodle. So this two step process is essentially the most important. Funny how that works.

6. Get the dough and lightly roll it into balls then roll the balls into the cinnasugar mix. Place them on a non-greased cookie sheet and lightly press them down. Bake them for 8 minutes and immediately place them on a wire rack to cool.

7. ENJOY!

I think another great thing about these cookies is that they bake really quickly so I get to eat sooner! These cookies have definitely changed my mind on Snickerdoodles. They're crispy on the outside and soft and chewy in the middle. I'm thinking about adding these to my Christmas cookie lineup this year and seeing what I can do with making them look more festive. I doubt festivity would matter considering these are (almost) everyone's favorite cookie. I hope you try them and fall in love with them just as much.

December 4, 2013

Homemade Caramel Corn

It has been unnecessarily cold outside these days. I wished for colder weather and I guess I got it. Now, it's not my fault that this weather makes me want to eat everything in sight but it does. So when I had a day off recently I really wanted something comforting and sweet. I set off to Pinterest to find something that would hit the spot, and boy did I find it. I can't seem to find the original source but if anyone knows who it is feel free to let me know so I can credit that wonderful, wonderful person. Anyway the recipe is Caramel Marshmallow Popcorn and is super simple to make. If you frequent Pinterest as much as I do, then chances are you've come across this recipe. And if you haven't made it yet you definitely should. Some pieces are soft and gooey and some are just sweet like kettle corn. Anyway, it's simply amazing and only requires a few ingredients. In other words, it's my dream recipe.
 What You'll Need


1/2 C of Brown sugar
1/2 C of Butter (it's worth it!)
Around 1/2 cup of mini marshmallows
1 bag of microwave popcorn

*I admit the ingredients may seem somewhat indulgent but it's the holidays. That means indulgent foods are a requirement. Trust me. I adapted this recipe because I'm not a fan of microwaving things if I can just use a sauce pan - textures, flavors, and things tend to get weird in microwaves. I did, however, use it to cook the microwave popcorn. I totally prefer stove-popped popcorn I just didn't have any so I went with the processed stuff this time and thought it came out great. Use what you'd like though. 

1. In a small sauce pan melt the butter. Add the sugar and wait for it to dissolve. Meanwhile, pop your corn and set aside in a serving bowl. You'll be adding the marshmallow mixture to the popcorn soon so make sure the bowl will be big enough. 

2. When it's approaching smoothness you can add the marshmallows. Confession, I used all of the marshmallows that I had. Like, all those in the picture went into the butter. Minus the one's I ate of course. it was a lot of marshmallows. Now that this is off my chest we can move on. You should have this on low-medium heat just to make sure it doesn't burn. Now stir! Mix it until the marshmallows become creamy, kind of like you're making Rice Crispy Treats. 

3. When it's all mixed and smooth pour it on the popcorn. Gently stir that to incorporate all of the ingredients. Then voila, you have caramel marshmallow popcorn! I suggest eating this with a partner because it does get pretty sweet. And if you conquer this yourself then hell yeah to you! I hope everyone enjoys this. Cheers, until next time!

July 31, 2012

Lemon Chicken


Everyone loves takeout. I don't care if you're willing to admit it but I know it's true. Come on, you're a foodie I would never hold that against you. I do, however, recognize the drawbacks of the usual takeout foods like that they're greasy, full of MSG, fat, and everything else that makes them good. So how can you resist a recipe that is homemade and BETTER than what you get for $8.00 a portion at a restaurant? I don't think you could.

I'm posting a few more pictures here because the steps are pretty specific. Hope they help.

What You'll Need:
2 1/2 lbs of chicken breast
2 Tbsp soy sauce
1/2 tsp salt
3 eggs
1 cup cornstartch 
1 1/2 tsp baking powder
pepper
Oil for frying
(recipe for sauce is below)

1. Start by cutting your chicken into cubes. We're going for bite-size here.

2. Add the soy sauce and salt to the chicken. Cover and place it in the fridge for at least 30 minutes. Don't be afraid of the soy sauce here because you're not going to be adding any salt later. Now's the time to get salty.

3. When the chicken is almost ready get your oil hot. You'll need about 2 inches of oil. You can also get your batter ready.

4. In a bowl mix your cornstarch and baking powder. When it's mixed add your eggs and pepper. It's going to be hard to mix because of the cornstarch so you'll have to mix pretty fast in order to get everything incorporated. It's kind of like a science project.

5. Put your chicken in and get it all coated.

6. Put small batches of chicken in the oil in order to control cooking temperature. We were able to get everything done in two batches. Cook until the chicken is "the right color" (Mike's words, not mine) then use a meat thermometer to make sure chicken is fully cooked. Put it on a paper towel covered plate to drain any excess oil.


Lemon Sauce

What You'll Need: 
1 cup chicken broth
2 Tblsp of cornstarch
1/3 cup sugar
2 Tbsp lemon juice
3/4 tsp salt
2 Tbsp oil
1. In a small sauce pan (which is appropriate) combine your chicken broth, sugar, lemon juice and salt and warm over low heat.

2. Remove this sauce and place in a bowl so you can add the cornstarch. Whisk it together. 

3. When it's all mixed heat the 2 tablespoons of oil in the sauce pan so it get's really hot. When it's ready add the sauce back into the pan and mix frequently until it thickens. If you want make the sauce pop a little more add two drops of yellow food coloring
The sauce pre-food coloring and thickened.

With the food coloring added. A little really goes a long way.

4. Pour the sauce over the chicken and coat it evenly. Mmmmm.....

5. Serve with your favorite sides and ENJOY!

We usually serve this dish with rice and broccoli. Honestly the chicken is great base for any sauce or just as-is. The soy sauce marinade gives the chicken a really great seasoned flavor that makes it hard to resist eating the chicken on the spot (hard until the sauce is ready, anyway). The sauce is really sweet and has a great tang. It really is the best homemade takeout dish and better than what you find at a restaurant.


July 16, 2012

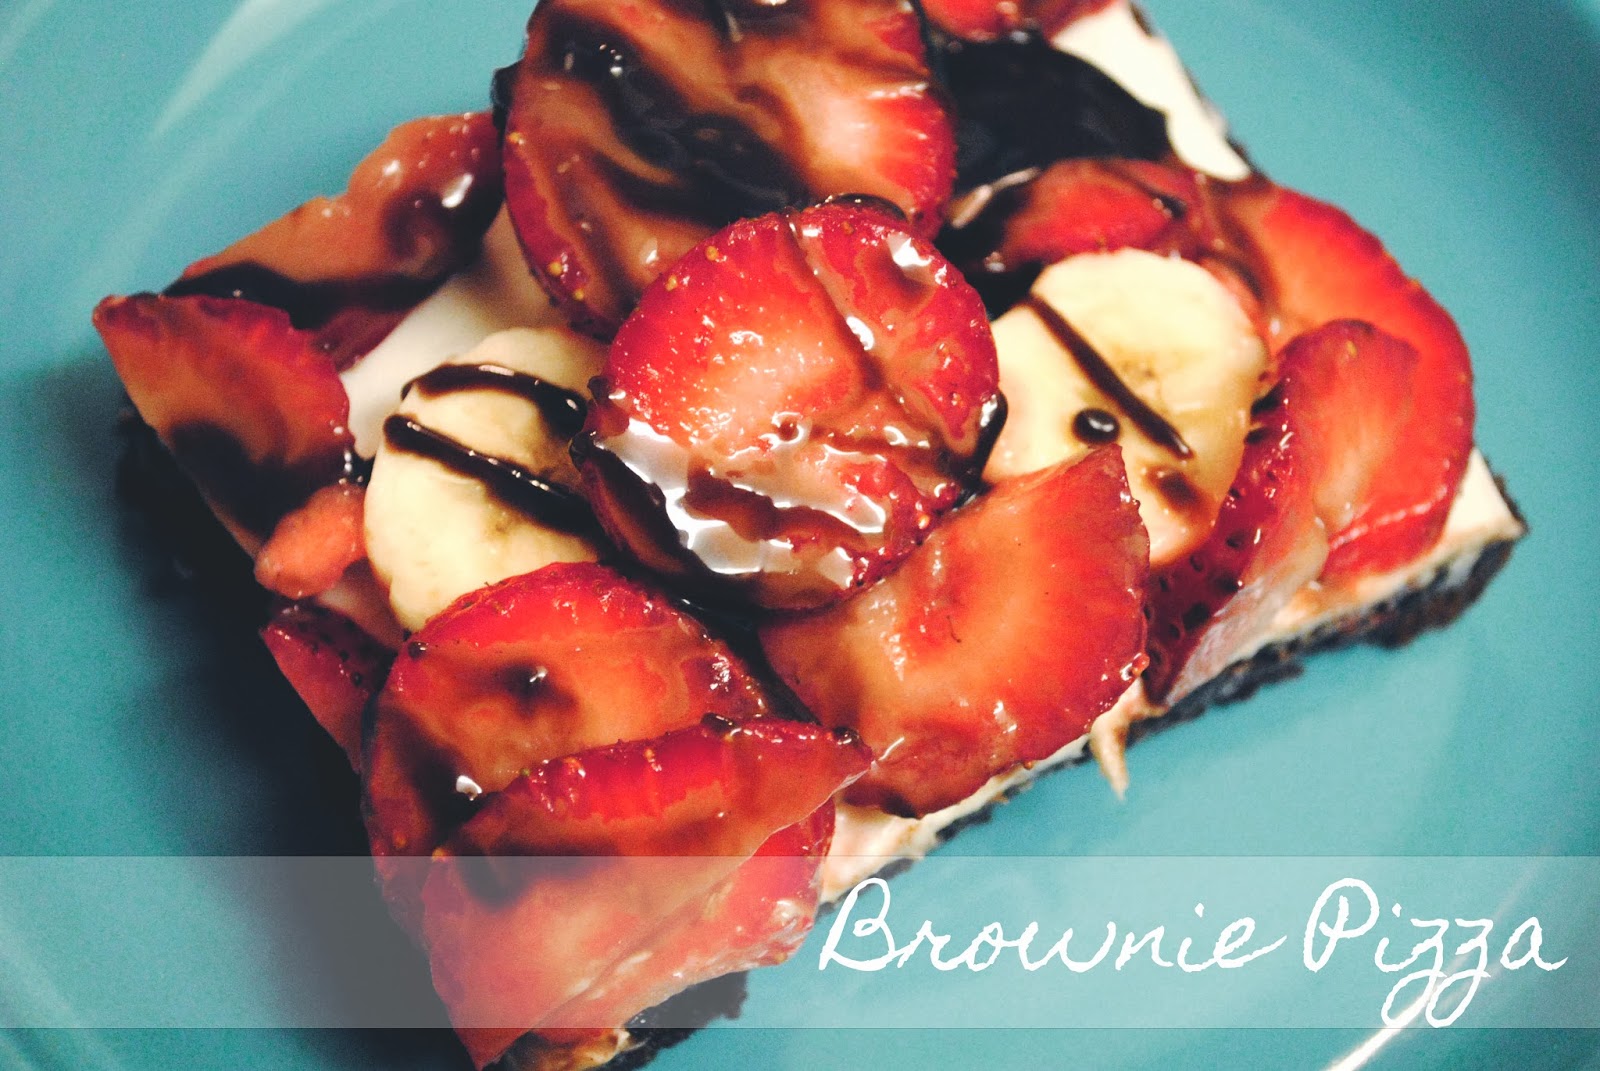
Brownie Pizza

 It's been a long time since I've posted a dessert but the time has come and I think you're going to like it! It all started the other day when I had a basket full of fresh strawberries and nothing to do with them. I planned on eating them like so but decided to make a dessert instead, the problem was that I didn't know what to make. Out of nowhere I remembered this dessert my mom had brought home from work once and knew that was exactly what I was going to make. We call this incredibly decadent dessert Brownie Pizza but Mike calls it a tart and I'm not sure why. And even though there is fruit on this, I recommend putting the calories away for this one.

What to Do:
1. Start by making a brownie mix according to the directions on the box. You can use a homemade brownie mix or the box stuff. I obviously don't bake much (if you follow my blog you know I like my baking shortcuts) so I gladly used my usual boxed brownie mix. Oh simplicity.

2. Instead of putting the mix in the usual 13x9 baking dish, put it on a cookie sheet that is really well greased. I believe the one I used was 13"x10". Cook for 15 minutes at 350 degrees. 

3. 15 minutes later you'll have exactly what you need. Make sure you let it cool completely. This is a cold dessert so I recommend letting it sit out or in the fridge for a couple of hours.

4. Next it's time to make the frosting. Use one package of cream cheese and 1/4 cup of sugar and beat together until the sugar is totally incorporated. If you taste it, you have to try not to eat the whole thing right then and there. Trust me, I know how tempting it will be.

5. When the brownie is fully cooled you can either move it to a fancy platter or leave it be on the cookie sheet. Because I'm not a baker I tend to have to little luck with my baked goods being transferred cleanly and in one piece so I opted to leave it on the cookie sheet. No biggie. When you have the brownie correctly placed slather (yes I meant to type that) the cream cheese frosting on top, making sure that you get the ends and corners with extra. I usually hate the edges of baked goods which I why I tend to over-compensate with them.

6. Now for the healthy stuff. I've never used any other fruits than bananas and strawberries but if you ever try this and use something else, please let me know! The important thing to remember for the fruit is to make sure all of the slices are even AND that they are patted dry to get rid of any extra moisture. You can just use a paper towel for this.

*I used two medium sized bananas and laid those down first because I know they go brown and I wanted this to look pretty.

7. Then add the strawberries.

**This is where it gets interesting.

8. Heat the fudge according to the directions then drizzle it over the brownie. You can also use chocolate syrup but I already had the fudge so I used it. 

Voilà! Foodie heaven! When you eat this you get a chewy, moist brownie with a sweet cream cheese taste. And just when it becomes too much you get the freshness from the strawberries and bananas that cut down the decadence and add their own refreshing sweetness. It's pure magic! I owe this dessert to my mother who brought it home and now has the recipe forever on my blog! Thanks mama! So I hope this has tempted you to get up and eat something sweet! Go ahead, go - I won't judge you. Until next time, cheers!


July 14, 2012

No Fuss Spinach Dip

Do you know my favorite part of pizza night? Well besides getting to eat pizza, it's also being able to eat all those junk food extras like buffalo wings, cheesy garlic bread, mozzarella sticks or, in our case, spinach dip. I love having sides with pizza because if you're going to indulge in pizza, possibly the best food ever, then you might as well go all out, right? And I have a great fondness spinach dip so when all we had in our freezer was a frozen pizza (reserved for nights when we both get off work late and don't have time to cook - please don't judge me, we're in college and they're delicious) then I knew that was my chance to add something fun on the side. To me a frozen pizza is like a blank canvas in that you can add your own snacks and sides or toppings in a quarter of the time to get something really cool and totally custom made.

Like I said our pizza was for after work so before work I decided to get some kind of side ready so we could come home and eat. I started craving spinach dip, unfortunately I didn't have the things I usually use like water chestnuts or leek soup mix so I had to improvise. And because I came up with this idea last minute I was determined to not have to go out and buy anything for this dip. The end result is a great throw-together dip with things you already have in your kitchen, and the best part is that it tastes so good no one will ever know!

What You'll Need: 
1 package of froze spinach
1/2 of a small onion
1 small red pepper
1/2 cup of mayo
1/2 cup of sour cream
2 Tblsp of garlic powder
3 Tblsp of Parmesan cheese
sourdough bread for dipping

What To Do:

1. Thaw out a 9 oz. package of frozen spinach. If you have the microwave kind, great. If not I usually put the frozen block in about a half-inch of simmering water and let it thaw out.

*If you're using this method, then use a fork to break up the chunks being careful not to scrape your pot. It breaks my heart just thinking about it :(
2. Once the spinach is drained give it a rough chop to make sure that it's not stringy or that the leaves aren't too big (no one wants a giant string of spinach). Also, mince up half of a small onion and the pepper.

3. Mix the spinach, onion, and pepper in a medium bowl.

4. Add the mayo, sour cream, Parmesan cheese, and garlic powder to the spinach mix.

5. Once everything is thoroughly mixed, cover with plastic wrap (making sure the plastic is touching the dip) and place in the fridge for at least an hour - but more is preferred.

6.  Cut sourdough bread into bite-size chunks and enjoy!

July 4, 2012

A Foodie Goes to Maui


Summer Vacation....
I'M BACK!! Can you believe it? How long has it been? Too long! I'm so excited to get back to blogging my awesome foodie adventures because I have so much to share with you all. I know I have a terrible habit of putting my blog on hiatus while I'm in school but I have to prioritize my time... and be an adult and junk like that. Anyway let's focus on the fact that I'm back! I actually planned on blogging as soon as my summer vacation started at the end of May but I had a little vacation to go on.... a little place called Maui ;)

Pre-vacation Preparations....
As you could imagine planning a week-long trip to another state in the middle of the Pacific takes a lot of planning and a lot of extra hours at work. I decided to start my blog up again with a post-vacation post because how could a food blogger not take advantage of all that great Hawaiian food and other good eats you're allowed to indulge in on vacation? I think I made the right decision.

Maui....
After a rough departure (something about a crappy engine on the side of the plane I was sitting on) and having to turn around back to San Francisco, we finally started our 5 hour plane ride. Our first night was rather uneventful as it was already dark when we arrived to our part of the island. We did pick a burger place to go  to which ended up being a good idea because our waiter gave us some great tips for our trip. The next morning we took a helicopter ride around the island. Along with the ocean and a billion beautiful waterfalls we saw beautiful fields of pineapple and sugarcane.
View from our helicopter
When that was over we headed over to a winery in Ulupalakua where we tried pineapple wine and had lunch at a the Ulupalakua Ranch Store where I was able to try my first plate of real Kalua pork and mac salad! I was so incredibly excited! The store sold local jams, sauces, candy, t-shirts and anything else you want. In the back of the store there was a counter where you could order from a select menu of local food. It's one of the coolest places I have ever seen. The area was full of coconut trees and trees with fruits I didn't even recognize. And the pork definitely lived up to the hype.
That evening, Mike and I went to Lahaina which is the area with all the restaurants, right on the ocean. It's one of the best places to see the sunset if you're ever there! We looked at all the shops, ate gelato, and enjoyed being in Maui. I tried my first macadamia nut and coconut candy that's also known as island crack to the locals. After tasting it I fully agree with the name. We had dinner at a resort that night and listened to a local Hawaiian band while enjoying more cocktails.
Where I fell in love with macadamia nuts!
Front Street
The real deal!
Dinner after our first full day

Our Anniversary....
This is actually the main reason we went to Maui. We wanted to celebrate our four years together while celebrating surviving another semester. The day started bright and early with a walk on the beach that was right behind our hotel (funny how I only get up early on vacations). We went to breakfast and I realized that Maui only has breath-taking views. Since it was our first breakfast on this vacation I was excited to go all out (Kona coffee anyone?) which basically means I started the day with a lot of food.
The beach that I could see from our lovely hotel room!
That night we went to a place called Kimo's on Front Street. We made reservations the previous day to have dinner during sunset. Good call. We got there early and got some Mai Tais and Pina Coladas at the bar and enjoyed the view.
 We got some sashimi as an appetizer then I ordered the cioppino and Mike got the prime rib.
Maui-rita and Mai Tai
Our Maui sunset
Hula Pie: A local piece of magic and the perfect dessert

Road to Hana....
If you don't know what and where Hana is all I can describe it as is an old Hawaiian gem of a town that can only be found by driving on the cliff of a mountain, through jungle and bamboo forests. It's like a concept from an India Jones movie. Jungles, cliffs, waterfalls, a turquoise ocean, falling fruit, a winding one-way road with locals zooming by in the opposite direction and some of the best damn banana bread I've ever had! Let me just say as beautiful as it was I'll probably never drive the whole length of the road - it's just too dangerous BUT I will go half way to Hana just for the banana bread that was sold in some small hut by the nicest locals of a town I've ever met.
Yeah there's a road on that tree-covered cliff and we were on it.

 
Aunty Sandy's Banana Bread stand


On the road there were some great places to stop to get more local fruits. Once we actually got to Hana we had burgers at one of the few places to eat. The beef was locally raised and really amazing.
   
As "free range" as you can get :)
Local Food....
We went off on our own one day to try some Loco Moco from a place that was down the street. If you're a foodie you probably know this but if not, Loco Moco is a wonderful dish that has a beef patty on top of a bed of either fried rice or white rice, that is topped with a fried egg and slathered (I love that word) with brown gravy. I could definitely see this dish being something that is accentuated at say two o'clock in the morning...
There are no words...
When got back from an all day road trip that practically took us around the entire left part of the island Mike and I went out for an anniversary 2.0 dinner. Sushi! We got sashimi and a really fresh "California roll" with fresh crab inside (something I'm not used to) that was topped with tuna, salmon, and avocado! Oh my.... For dessert we got a new favorite of ours. We tried creme brulee our last anniversary so we couldn't pass up the new tradition. Would you?

Luau...
We moved our Luau time to the last night we were there as a sort of farewell to the island. I have never seen anything like it before and the food was, from what I understood, good and traditional. I loved it either way. There was chicken that I would have taken through an IV if I could, there was poi (tarot root), kalua pork, Hawaiian rolls, pineapple and a bunch of other really good things that I fell in love with.
Delicious! Yes I'm talking about the pig....
Another pina colada

Aloha and Maholo....
What better way to say farewell than a goodbye breakfast at one of the most popular breakfast places on Maui? The Gazebo is just that - a gazebo. The line gets long as people wait to grab a seat for probably the best Hawaiian breakfast ever. They are known for their "banana mac" pancakes and ginormous plates of fried rice. I opted for the pancakes. Another good choice.
 
It's right by the ocean
Banana and macadamia nut pancakes
Then there was fish tacos. Since our plane didn't leave until 9 pm, we had some time to kill. I promised Mike I would find him the best fish tacos, so I did just that. Ono Tacos is owned by a couple with a BBQ grill outside of an inn. They use Ono fish and put a chipotle sauce on top. Mmmmm! The fish isn't battered either, it's just grilled and left to be amazing.
 
 
Happy boy
Time was drawing closer to the end and we had time to grab one last island treat before we left. Shave ice is probably one of the best things I have ever tried. It's totally not like a snow cone and is so smooth. It really was a great way to end the trip.
 

I'm glad I got to start this blog up again with food that really has changed how I eat. As a foodie, there is no greater gift than trying something new - and loving it. I'm glad to be back and to share what I've been up to in my kitchen these last few months. Until next time, cheers!

And Happy 4th of July!